Tuesday, August 24, 2010
Saturday, June 26, 2010
DIY Mini Bottle Cap Jewelry

We are going to show you how to make your very own mini bottle cap earrings in 5 easy steps! These unique earrings are the perfect hassle free project for kids and adults.
Here are the supplies that you will need:
-mini bottle cap pendants
-mini digital images (1/2 inch)
-1/2" epoxy dots

Here are the supplies that you will need:
-mini bottle cap pendants
-mini digital images (1/2 inch)
-1/2" epoxy dots
Gather your supplies

STEP 2:
Choose the perfect design and punch it with your 1/2 inch hole punch.

STEP 3:
Glue the design into your mini bottle caps.

STEP 4:
Peel off the epoxy dot from the vellum paper,
trying to carefully keep your finger tips to the
edges of the dot (if you touch the underside,
sticky part of the dot, it will show your fingerprints!
Just a little FYI!) Then place the dot on top of the image.
trying to carefully keep your finger tips to the
edges of the dot (if you touch the underside,
sticky part of the dot, it will show your fingerprints!
Just a little FYI!) Then place the dot on top of the image.


STEP 5:
Attach your bottle cap pendant to the fish hook
earring wires. This can be done fairly easily
without tools.
earring wires. This can be done fairly easily
without tools.

You're done! Enjoy these super cute earrings!
Kids will love to have a pair to match each
outfit. My 7 year old daughter created her own
pair while I was making these and we had a blast! I
only needed to help her attach the bottle cap pendant to
the earring. I highly recommend this craft as a
creative project without frustration and one that
will get lots of use instead of thrown in the garbage
after a few days like so many of the crafts that are fun
to do with kids.

Check out our creative ideas page at BottleCapCo.com
for more fun mini bottle cap ideas!
Friday, March 26, 2010
DIY Bottle Cap Magnets
We are going to show you how to make your very own bottle cap magnets. These are super cute, and very easy to do! The possibilities are endless. We know you will enjoy making this "sweet" treat!
Here are the supplies that you will need:
-bottle caps (flattened or unflattened)
-digital images
-1" epoxy dots
-magnets
-e-6000 glue
-1" hole punch
STEP 1:

STEP 2:
Glue on your images with the e-6000 glue.
You'll want to put on enough glue to secure the
image to the bottle cap, as this will also help the
epoxy dot stay more secure as you will see in
the next step.


STEP 3:
Peel off the epoxy dot from the vellum paper, and
trying to carefully keep your finger tips to the edges
of the dot (if you touch the underside, sticky part
of the dot, it will show your fingerprints! Just a
little FYI!) place the dot on top of the image.


STEP 4:
Place a small dab of glue on the back of the
bottle cap and take one of your magnets and
place over the glue. Allow 8-12 hours to cure.


And, ta-da! You've just created your very own
fabulous bottle cap magnet magnets! These
will look super "sweet" on your fridge! Enjoy!

Thursday, January 21, 2010
DIY Scrabble Tile Necklace
We are going to show you how to make your very own scrabble tile necklace. These are very funky and fun! They have so many possibilities too! But for today, we'll be sticking with showing you how to make the basic scrabble tile necklace.
Here are the supplies that you will need:
-scrabble tiles
-scrabble tile images
-square epoxy dots
-bails
-e-6000 glue
-necklace chain
STEP 1:

STEP 2:
A small layer of glue should do the trick.
You don't want glue oozing off of your tile,
so just put on enough to secure the image.


STEP 3:
Place a small layer of glue on the back
side of the bail.


STEP 4:
Peel off the square epoxy to place over your
scrabble tile image. Make sure to firmly
apply pressure over all area of the epoxy
to make sure it is secured completely.


Once the glue has had a good chance to dry, you
can go ahead and string your favorite necklace
chain through the bail, and... Walla! You have
your very own, funky & fun scrabble tile necklace!

***Even though the epoxy adds a layer of
protection for your image - make sure that
you know that these are NOT waterproof.
Make sure to let the wearer of the necklace
know that as well!
Stay tuned for our next project:
bottle cap magnets!
Monday, December 7, 2009
DIY Bottle Cap Choker Necklace!
We are going to show you how to make your very own bottle cap choker necklace. These are very hip and the latest trend right now! And they are fun to wear and switch out your favorite bottle cap designs to match whatever outfit you're wearing!
Here are the supplies that you will need:
-bottle caps (flattened or unflattened)
-bottle cap images
-epoxy dots
-nylon chokers
-e-6000 glue
-washers
-super strong neodymium magnets
*All of these supplies can be purchased at Bottlecapco.com! Just click HERE and you will be taken to our website to purchase your items.
STEP 1:
Gather your supplies

STEP 2: Glue the bottle cap images into
the inside of the bottle cap


STEP 3: Place images and get epoxy dots
ready for placement


STEP 4: Place epoxy dots on top of images -
making sure to seal image securely by pressing
firmly on all parts of epoxy dot.

STEP 5: Glue on magnet

This is what the finished back the of bottle cap will look like

STEP 6: Looping the nylon choker through the washer
by pulling it through the open middle part like this.
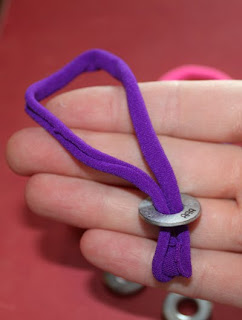

the open end of the opposite side like this.


Finally pull the nylon tight -
and this is what you should get.


Do this for all of your chokers.


product should look like! Enjoy!


Subscribe to:
Posts (Atom)